
I believe I am like many, who believe there is nothing then fresh baked breads ... but even better ones that you bake yourself. Years ago, baking especially goods that required yeast really eluded me ... trips to my local (yet very expensive) bakery were common every morning. My shopping bag would be filled with more baked elights then I could ever eat ... but there is really to be honest something so comforting, nourishing about baked goods.
BUT making them myselves ... oh, no ... I never used enough yeast, did not proof it long enough and even more difficult kneading the dough long enough to form the glutens.
My first baking projects were of course cookies, which seem to me the easiest then on I went to quick breads ... finally moving to Algeria I tried my hands with yeasty doughs. In the beginning, everything came out wrong BUT I did not give up. After a time, I got the feel how to create magic with dough.
For the beginner baker, I think English muffins are really one of the best methods to start for a beginner baker ... alchemy at its best chance for a novice to get the jest of how yeast works. A commerical English muffin compares nothing to the homemade version. And when you realize waking up just a little earlier will get you these. The simplest and best method that worked for me, was adaption from Happy Housewife's recipe for English muffins. She uses in AP flour or a mix of white and wheat. I tried her methid orginally exactly as in her recipe, but after a few times had to make adjustments for my kitchen. Later, the more my family liked these muffins, the more I played around .... to add more interesting flavours. Today, I will present the basic method ... which works for me in my kitchen!
English Muffins
- 1 1/2 cup of hot water (not boiling)
- 3 TBS of powdered milk
- 2 tsp honey (or pinch of sugar)
- 3 tsp of salt
- 2 cups of AP flour
- 2 cups of blé complet (whole wheat) flour
- 2 tsp - 9g instant yeast
- 3 TBS of soft butter
- cornmeal or semolina (moyen) for dusting
The directions today will be posted in the photos. But under them, will be my commentary ... I hope this is more clear and helpful. If it is just more confusing, please let me know!

Make your sponge by mixing the ingredients all except the whole wheat flour and the cornmeal/semolina which you will use later for dusting.
You can use also 1 cup of hot water and 1/2 of milk if you do not like to powadered milk. We drink only fresh raw milk; I tried using fresh milk here but I did not prefer the taste it gave so I just use powdered milk. Also it gave for economical muffins.
If you can get your hands on glutenous bread flour, use it! It equals for a lighter soft stretchier dough thus giving you a lighter muffins with more nookies and crammies!

I tried orginally to allow the sponge to rise only 1 hour but found that 1 1/2 hour works better for me in my kitchen.
I tried it both uncovered and covered, finding the dough did not develop a crust if I covered it.
I allowed it to rise in non-drafty slightly warmed kitchen.

The dough will look like this after it has risen, rather rough but elastic soft dough. It will naturally spring up if you press down on it.
Gently knead this dough in a floured board for about 5 minutes ( press, fold and turn)
 American style muffins are baked in a tin cirlce round baked in the oven, while the orginal Englishy muffins are cut out rounds that griddled on the stovetop. (My method I guess is combo of both)
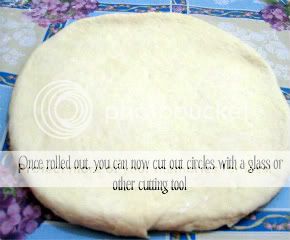
You can use any tool here; from the fancy cutters sold in the shoppes to what I use a large wide- mouth coffee mug to cut out the muffins. You will get about 10 muffins from this dough. I usually double the recipe for a week's worth of muffins.
You can also free form them for a more rustic look. BTW the last one, you will have to free form anyway!
Reuse the ends by re-rolling the dough out on a floured board.
At this point, if you would to slow rise them, meaning bake them at a later time ... allow them rise overnight in a cool area.

If you would a crunchy coating on your muffins, use cornmeal but if you like a more subtle crispiness to their bite use semolina (moyen).
Make sure to dust the tray also generously with the meal, as to not let the muffins stick to the parcement paper or tray.

Allow the muffins rise uncovered in a slightly warm area.
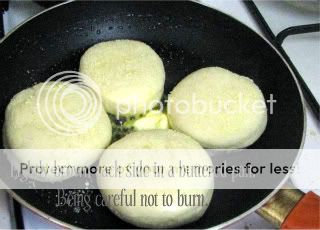
Browning them on a griddle would be the best, since the electrical machine will regulate the temperature but for people like me; who do not have these fancy machines, a simple fry pan or cast iron pan is the option.
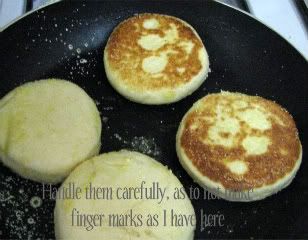
Handle them gently, finger marks can be easily visible; thou change nothing of the taste.
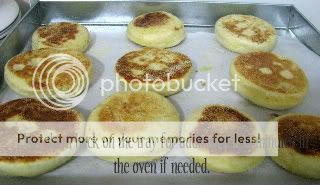 So again for people, like me who have no fancy equipment to regulate temperature, finishing the muffins off in the oven (at 350/180) for additional 5-8 minutes. But this time may vary according to your oven. For my oven, 7 minutes is generally enough.
 After about 7 minutes, check the muffins. Over baking them, will only hardened them.
The muffins can easily be stored in a tin or plastic bag on the counter if you consume them within 24 hours. Otherwise, store them in the fridge or freeze them for longer life.
Additionally, making your muffins with flavours is easy .... I went on a mega muffins making marathon 2 months ago, playing around ... these are what I came up with that I liked ...I will do some of these step by step at later date ...

Allow the muffins rise uncovered in a slightly warm area.
As they rise, you will notice cracking .... this is fine.

Browning them on a griddle would be the best, since the electrical machine will regulate the temperature but for people like me; who do not have these fancy machines, a simple fry pan or cast iron pan is the option.

Handle them gently, finger marks can be easily visible; thou change nothing of the taste.
Butter the pan generously for added flavour and of course, so they do not burn. Non-stick is not always non-sticking.
Butter and cornmeal burns easily so WATCH the muffins! - You may have to clean wipe the pan after each batch. I usually do 10 muffins in 2 batches ...
Brown them on rather low heat, so as to not burn them for about 4-5 minutes on each side. You will notice slight puffing of the muffins - this is good!
 So again for people, like me who have no fancy equipment to regulate temperature, finishing the muffins off in the oven (at 350/180) for additional 5-8 minutes. But this time may vary according to your oven. For my oven, 7 minutes is generally enough.
 After about 7 minutes, check the muffins. Over baking them, will only hardened them.
To know, if they are done:
simply press gently down on the muffins - they should spring back up.
they should not smell 'raw' or like yeast.
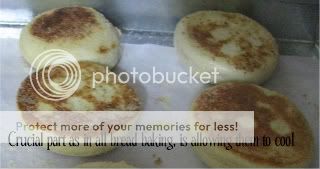
Storing the muffins:
Storing the muffins:
The muffins can easily be stored in a tin or plastic bag on the counter if you consume them within 24 hours. Otherwise, store them in the fridge or freeze them for longer life.
Additionally, making your muffins with flavours is easy .... I went on a mega muffins making marathon 2 months ago, playing around ... these are what I came up with that I liked ...I will do some of these step by step at later date ...
- Orange blossom muffins: add dash or two of orange blossom water and 1 tsp of nigella seeds to the dough mixure
- 'Health crunch': Use mix of 3 cups whole wheat or 1 cup AP flour for the dough; mix in 1 tsp of each flaxseeds and spourted wheat (kamut)
- Cinnamon raisin: Add 1/2 tsp of cinnamon and 1/2 cup sultanas into the dough
- Basil pesto: Mix in 1 TBS pesto in the dough. Warning, the dough will be pea green ... for some this may be strange!
- Provencal: Mix in 1/2 tsp Herbe de provence in the dough.
- Mediterean: Instead of butter, use 2 tsp of olive oil in the dough and also mix in 1/4 cup sun-dried tomatoes, 1/4 tsp basil and about 1/4 cup finely minced black olives that you have rinsed and minced in a robo
- Pumpkin spice: 1/4 tsp ground ginger, 1/4 cinnamon, few gratings of nutmeg and 1/8 tsp mace
To eat these gemmes, simply cut them open with a knife, toast them on a buttered pan ( yes, again get out the pan!) or in a toaster ... or be more complicated and get some jam out too ... or maybe top it with a fried egg or the ultimate make it the bed for a egg; cheese and homemade sausage sandwich great anytime of the day!
I have many more ideas but so far these have come out good tasting .... more later friends!
No comments:
Post a Comment
Did you make this? Or have a question about the recipe? Have some helpful feedback to share? Or just want to say hello? Leave comment love below :)
❤ ❤ ❤
Please note:
I do my best to respond particularly on recipes, but don’t have the ability to respond to every comment straight away. If you have an urgent question or comment, please contact me via email or Facebook. Please do not include links not pertinent to the discussion.