

بِسْــــــــــــــــــــــمِ اﷲِارَّحْمَنِ ارَّحِيم
السلام عليكم و رحمة الله و بركاته
As a foreigner living in Algeria, there is alot to appreciate here in Algeria ... the beautiful natural landscapes, the weather, the cultural traditions, the easy laid-back lifestyle but of course the mirad of tasty delights. One such delight one of my favourite comes to mind is Maârek. Called M'semen, Ensemna, Semniyette, Msamam, Moufleta or R'ghaif in other regions. Maârek is a special treat. The name M'semen means "fat" and yes, this isn't a skinny recipe; but it is reminiscence of home, childhood and of times lost. Maârek is to Algerians ... no to all to North Africans I think what palacsinta (crêpes) are to Hungarians, madeleines are to the French and maybe what chocolate chip cookies are to Americans ... a treasured souvenir from the childhood right from the hands and heart of Mama!

A specialty of all the Maghreb countries: Algeria, Morocco and Tunisia. Maârek are squares of dough very thinly spread out, folded in on themselves like an envelope then cooked to give the appearance of layered, flaky and tender parcel. They are like a cross between a pancake and a tortilla using the rough technique of making puff pastry.
Maârek, which means fattened really is fattening .... and addicting! Believe me, it is just that and much much more. If you ever had Maârek before, then you know what I mean ... it’s tender, flaky, messy, moist, chewy ... the kind of food you can pull apart and eat with your hands ... so so hard to resist.
It’s made with fine semolina, salt, a bit of butter/ oil and warm water. After that, everything is mixed into a smooth dough and kneaded until soft and elastic. The concept of Maârek is an ingenious one I think. Like puff pastry, a fat is folded inside the dough to build up thin butter layers when the dough hits a high temperature. But unlike puff pastry, it is cooked on the stove on a medium heat, and not baked in the oven.

Maârek making is fairly lengthly process that I usually reserve for lazy weekends when I have my children right in the kitchen kneading, stretching and folding the Maârek. It is excellent treat for the children and cook alike... straight from the pan, tearing it off while flipping the remaining Maârek. And due to the fact that Maârek is lenghtly detailed process to prepare I have chosen to share each step of the method.
I was taught how to make Maârek by my husband's cousin Yamina. (Thank you Yamina)But I just could never get it right as she made it. So I kept working at it. Some cooks (like Yamina) will say use only semolina while others say a mixture is better. I personally think using a mixture is easier to work with. The flour makes the dough tender and easier to stretch out, while the semolina gives that chewiness you want in each bite. And don't tell Yamina, but I now add alittle bit of yeast to the dough. It is a real cheat and no-fail trick for making this pastry. It aids in obtaining an elastic dough that does not tear. And the addition of semolina between the folds helping the layering. Alternatively, if you cannot find fine semolina flour in your area, use all flour. After a few years of tweaking here today I present my method for easier, successfully and deliciously tender Maârek.

active prep time:30 mins | inactive prep time:45 min | cook time:15-20mins
 makes 24
- 500g - 2½cups fine semolina (also called semolina flour or semoule ultra fine)
- 500g - 2 cups flour
- one pinch of dry instant yeast (less then one gram - 1/15 tsp)
- extra semolina for the layering
- generous pinch about 2½ tsp salt
- warm water (about 650mL - more then 2½ cups but it depends on the absorbation of your flour)
- Oil and butter (melted) for the work surface ( about 250mL - 1 cup)


๑۞๑ You can use a stand mixer machine, bread machine, robo or your hands to make the dough. I have a robo, but I usually make the dough manually.
But I must warn you, using a robocoupe (food processor) you could run the risk of burning out your motor due to the amount of time you'll need to run the machine. I personally, would advise not taking the risk.
If using a stand mixer, with the dough hook attachment, put flour, semolina, salt and warm water and knead for five minutes until you have a smooth and elastic dough.
If using a bread machine, simply place all the ingredients into the machine and push the setting called 'dough' or 'pizza'.
If using a robocoupe (food processor) mix the ingredients manually in bowl, then place the ball of dough into the machine, then using a pastry cutting attachment (or dough if your machine has one) knead the dough for 10 minutes. Adding alittle water at a time through the hole on the top.

If using your hands like I do: Put all the dry ingredients in a bowl. Mix the salt and the yeast with the flour. Now make a well in the center of the bowl and slowly add the water until you have a smooth dough. You won't use all the water preparing the Maârek manually into a sticky ball. But you will need the remaining water in later steps as you knead and stretch the dough.

Get your hands in there and mix and knead the ingredients.

Keep mixing until a ball of dough is formed.

The dough will still be sticky. Don't worry! This is how it should be!

Once the dough is formed, knead for another 10 minutes. It is a lot of kneading I know, but the kneading makes the dough elastic.

Your hands will get tired but keep on kneading. Even enlist the help of children or other to aid in the kneading.

Keep stretching the dough against the work surface. Every few turns splash little water (few drops) on the work surface then continue to knead the dough until the water is absorbed into the dough. You need to knead until you have kneaded in all the water. If your dough is sticky, continue kneading, it will absorb into the dough as you knead.

After all the kneading , the dough should be a soft, slightly puffy and malleable dough.

The dough should be soft to the touch. And it should bounce back. If your finger mark stays on the dough, the dough isn't ready. Continue kneading.

And very stretchy. If it easily tears, then you know you have not kneaded the dough long enough. So then keep on kneading it!
So remember, if it isn't malleable, bouncy or if it tears - your dough isn't elastic enough.
Now to form the balls: Here you will need the oil/butter mixture. Alternatively use all melted butter or all oil, if you like. But the half and half combination is prefect since the butter adds flavour while the oil balances out the fat so it doesn't burn easily when cooking.

Now with your hands, form tennis ball shaped balls of dough. Regrease your hands as needed.

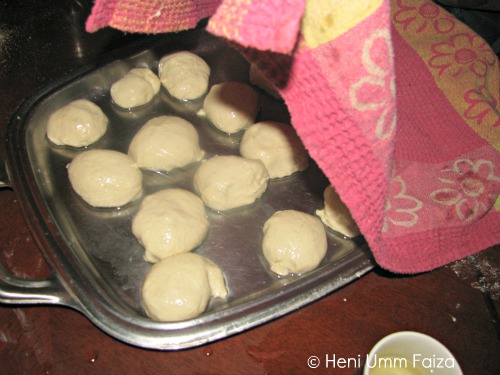
Form 24 balls. And generously grease each ball. I know this may seem like a lot. Well it is ... for sure this isn't a treat for dieters! But the extra fat on top of ball prevents them from getting hard, or forming a 'crust'. A crust would prevent you from stretching out the dough.

Alternatively, just dip each ball in to the cup of the butter/oil mixture so the whole ball is completely covered. Now Place them all on a greased tray.

Now cover them with a clean kitchen towel. And allow to rest for 30-45 minutes.
After 30-45 minutes check your dough.

The dough should be ultra soft and extremely elastic. It is more softer then a bread dough and stretchy like chewing gum.

Now grease your work surface! Yes, I know even more FAT!!!
Work with one ball of dough at a time. Cover the rest of the dough with the kitchen towel so they don't dry out. If you live a hot, arid region your dough may be dry out so just re-grease them.
.In Algeria, many use a huge platters called guesâa on which they flattened and fold the dough. I personally my table so I have more room. Oil the plate or work area very well.

Now take one ball of ball, and flatten out with your hands using a clockwise patting motion. Be gentle so the dough does not tear. Pat, pat, pat. Pat them out ever so gently.

The balls at this stage will be very soft, even slippery once in your hands. You can easily manipulate them. Place one ball on your works surface, gently pat the ball out so that it flattens (without creating holes) Gentle is the key here. Do not use a rolling pin. Oil your hands as needed. Once the dough is flattened out. With the tips of your fingers GENTLY brush the dough from the center out.

Now again with your finger tips, gently lift the dough. And insert your hand under the dough. And now GENTLY stretch using your finger tips the dough. And repeat the process going all around the dough counter-clockwise. If you are a strudel, rétes, pyhllo or yufka dough maker you will know this technique.
REMEMBER: Pat, brush and pull with your finger tips. These are needed movements for making the dough.

Be gentle!!! Or you will tear the dough! (see above) But if you do get some small holes, it's fine - most of them will be covered
Trick: If you have some edges that are thicker you may cut them off with a knife. As you don't want thick bits of dough in your Maârek. Maârek like strudel or phyllo should be super thin. See through in fact!
At this point, if you have one of those large electric griddle you could all the folding on the griddle itself. No fuss to transfer the envelopes.
At this point, if you have one of those large electric griddle you could all the folding on the griddle itself. No fuss to transfer the envelopes.

(At this stage, before folding you could add a filling to your Maârek making them what is call Mahadjeb you would put the filling in the center, then fold -- savoury or sweet filling)
Once you have stretched out the dough you can start folding.

Now fold the circle of dough like an envelope. And sprinkle little semolina on the dough before each fold. This ensures the layeres seperate and also makes your Maârek more chewier.

Fold right and left sides first, then bottom and up

The folded Maârek envelope ready to be cooked.

Now gently lift your Maârek when transporting your Maârek as it continues to stretch. It can easily be misshaped. But if that happens - no problem. It is only a matter of aesthetics. I like to place the Maârek on top of hand then flip it into the pan.

Traditionally, Maârek is baked on a clay tadjine - like this here.

But they can easily baked also on cast iron pan or crépe pan. I use a crépe pan that I reserve for only prepaing Maârek, omelettes and Beghrir. The above pictured tadjine I only use for making bread.

You should not use any pan that has the Teflon coating worn off or a pan you have cooked let's say meats in ... since you will only end up having burnt pastry. A real waste for all the work this treat requires.
Put your Maârek , smooth side first, on the pan, without adding oil or butter to the pan.

If your Maârek is more retangle then square it is fine.

Bake the Maârek on a very low heat for about 5 minutes on each side. Bake until lightly coloured. Flip on the other side and cook again until few brown spots appear on the surface. Do not overcook as they are supposed to be tender and not crunchy or burnt. Baking them on a low heat is important not only so they don't burn but also that the inside is cooked not raw. You don't want a burnt outside with a raw inside!

Flaky and tender layers.

Maârek is tasty enjoyed straight from the pan after cooking .... But it’s even better drizzled with honey (or jam or even Nutella) rolled like a crepe and enjoyed with a sip of sweet mint tea or cappucinno between each bite. Maârek are usually eaten for Suhour (the meal before fasting) during the Islamic month of fasting Ramadan, for breakfast or in the afternoon with coffee - as a afternoon/after school snack.

Maârek is scrumptious when served hot, but can be very blah and tough when cold.
They don’t keep very well at room temperature for more than a day, as they tend to dry out. But if you don’t want to serve them right away, or just have some leftovers, wrap them and freeze them. When ready to serve, take them out of the freezer and put the, without thawing, in a sheet pan and into a 180°C -350°F oven for less than 10 minutes, or until warm through. Or alternatively, take out them out of the freezer the night before (or least 4hours before serving)) and reheat them on the fry pan you prepared them in. Both ways - they will taste as if you’ve just made them.
Don't microwave them as they will taste dry and chewy.
Maârek is in the genre as other Algerian pancakes such as Meloui, Mahadjeb (also called Mahjouba in some regions), and R'zett el Qadi. I will be preparing those in the future for you all.When Maarek is filled as I mentioned is called Mhejb this is excellent as a snack or accompaniment to soups or salads, one of my favourite budget friendly meals.
Size- Wise
If 24 Maârek is too much for you, then you can either half the recipes (keeping the amount of yeast the same) or prepare the full recipe then freeze the Maârek.

pancakes & waffles, breakfast, Algerian, Moroccan, Ramadan, suhour
what would you spread on these babies?

Let's keep in touch! Sign up for posts delivered right to your e-mail inbox or subscribe to my feed. You can also 'like' me on Facebook, pin posts on Pinterest or follow me on Twitter for all the latest recipes and updates.
share this on


Asalaamu alaykum tank you my sister to post the receipe. love, khadjah
ReplyDeleteNice blog here! Also your site loads up fast! What web
ReplyDeletehost are you using? Can I get your affiliate link to your host?
I wish my site loaded up as fast as yours lol
Feel free to visit my blog ... volvo auto
Hi, what is the sauce pictured with the Maârek? Do you have a recipe? Thanks
ReplyDelete